
 Warning: This seems complicated, but after you've done it once or twice, it will become much easier. So don't give up!
 After trying and failing to make injera for about a year, I finally was blessed with an Ethiopian woman, Abeba, who has become a very dear friend. Abeba is a wonderful cook and has spent quite a bit of time with me helping me to make injera the way Ethiopians in America make it.
I've made enough successful batches of injera that I now feel comfortable sharing it with my readers. I will give written step-by-step instructions. For the visual learners, I have also uploaded videos demonstrating each step. As people begin their own experimenting with injera, I really hope you'll share your tips, as I have learned so much from other people's successes and mistakes alike. Good luck and don't give up! It might not work the first time, but even Ethiopians don't often get it right on the first try! :) Note: This is how the process works in America. I know that it is affected by altitude, quality of teff, and temperature. So, it may take some experimenting in order to get this to work in other places. For that matter, it may take some experimenting in some of the higher elevation places in America. This is NOT the same process that Ethiopians use in Ethiopia. This is the process that Ethiopians have adapted in order to make injera in America.
1. You need to start with a good strong starter. Click here if you don't know how to make a starter. All of the information contained in this post regarding making your starter is good, accurate information. There are also lots of ways to get a starter going that are quicker (and less smelly) than this method which relies on wild yeast found in the air. You can use a commercial yeast. Or you can even buy a starter from some bakeries. Since I haven't done it these other ways, I don't know how it works. But there is a wealth of information about sourdough starters on the internet. If you are using the "wild yeast" method, you'll need to give your starter at least 2 weeks to build up it's strength. The good news is that once you have a strong starter, as long as you take good care of it, you'll never have to make another one.
2. If your starter (lit in Amharic) is made of any grain other than teff, you'll need to convert it to a teff starter first. This only takes 2 feedings prior to actually starting the process of making injera. I believe it's detailed in the post about making a starter. By doing 2 feedings prior to the actual process, the injera will have more of the sour teff flavor that it's supposed to have.
3. Injera is a 3-step-process. About 8-12 hours is required between each step. I usually do step 1 at night before I go to bed. Then I do step 2 when I wake up the next morning. Then I am ready to cook the injera in the mid-afternoon.
Click here to see a video demonstrating all of the items/ingredients you will need to cook injera.
mitad
lid for mitad
sourdough starter
blender
sifter or metal strainer
at least 2 plastic containers
teff
self-rising flour
luke-warm water
bed sheet
something large and flat to remove injera from mitad
Step 1 (The Night Before)
Click here for a video showing the kneading step.
Click here for a video showing the "thinning out" step.
You will need your teff starter. If any liquid has gathered on the top, pour it into the sink. Usually, there will be a dark blackish liquid if you've kept it in the refrigerator. This is okay. But you don't want it mixed in.
I'm sure that with some experimenting, the amounts that I will give can be changed and altered depending on your personal tastes. Just as in America some people prefer whole grain bread, or wheat bread, or rye, or white, injera is a matter of personal preference as well. The amounts I will give produce a medium-dark injera. Most restaurants I've been to serve a more white injera. Most Ethiopians I know prefer to eat the darker injera. Experiment to find what your family likes best. This recipe will make about 10 16 inch injeras.
Start with 2 cups of starter. Mix in 2 cups of teff. The mixture will start out crumbly. You will need to knead (mopkwat) the starter (lit) ALOT!!! The more you knead it, the better the injera will be. If your arm starts hurting, you're doing a good job! As you continue to knead, the dough will become a solid ball. This is good. Knead it for at least 10 minutes. After you've done that, you'll need to begin adding luke-warm water just a little at a time. Add 1/4 cup water at a time, then knead the mixture some more. Once the water is thoroughly mixed in, add another 1/4 cup. Continue doing this until the mixture has become quite thin and watery. The test is to put your hand in, then pull it out. You'll know the consistency is right when the batter slips quickly off your hand, leaving behind just a thin residue of the batter.
Cover the starter with a lid and let it sit on your counter overnight. Go to bed! :)
Step 2 (The Next Morning)
Click here for a video showing the "blending the teff starter" step
Click here for a video showing the "self-rising flour" step
When you wake up in the morning, you will probably see a 3 layered starter (if you have a clear container that is!). The bottom layer will be the tallest layer consisting of injera starter. The middle layer will be a very thin layer of liquid. And the top layer will be another layer of injera starter. This is good. If yours doesn't look like this, just keep going anyway because even if it doesn't turn out good, you'll learn from the experimenting process.
You will need to use a blender for this step. My Ethiopian friend who taught me to make injera said that it must be a blender. She has tried using a food processor and her injera didn't work. So, I've done as she said, and I've been successful.
You will need to gently stir up the injera starter. After you've stirred it, SAVE 1 OR 2 CUPS FOR THE NEXT TIME YOU MAKE INJERA!!!!!!!!!!!!!!!!!!!!!!!!!!!
You will be most upset if you accidentally use all of your starter and don't have any left! Trust me on this one. I'm speaking from personal experience! :) Store the starter in the refrigerator up to a month at a time. It's probably better to pull it out once a week and give it a regular feeding of water and flour, but you can get by with a month. It just might take 2-3 feedings to get it built back up in strength before making injera if you wait that long.
1 cup at a time, you need to blend the starter in the blender. The goal is to get rid of the gritty feel. Alternate settings on the blender. After maybe a minute, rub some of the starter between your fingers. If it feels smooth with only a very slight amount of grit, then it's done. Pour the starter into a clean plastic container after you've blended it up.
Next, you need 3 cups of self-rising flour. Add warm water to it and mix with your hand. The consistency needs to be soupy. After you do this, you'll need to blend it up just like you did the teff starter. It doesn't take as long in the blender though. The goal of this step is to get the mixture smooth and free of lumps of flour. Just as with the teff starter, you'll want to blend it up about 1 cup at a time. When finished, pour it into the container along with the teff starter.
Next, use your hand to thoroughly mix the two mixtures together. The final consistency needs to be thin and watery and soupy. Again, the test is to dip your hand in. If the mixture slides off quickly and leaves a thin residue, the consistency is right. If the consistency doesn't seem right, you can thoroughly mix in more water a little bit at a time until it is right.
Cover it with a lid and let it sit on the counter. Check on it every hour or so. You will notice that the mixture will begin to rise. This is good. In fact, the more it rises, the better the injera will be. Once the rising subsides and the mixture begins to settle back down, put it in the refrigerator for 45 minutes- 1 hour.
Step 3 (The Afternoon)
Click here for a video showing the cooking step
By the time you put it in the refrigerator, it will be the afternoon (unless you sleep in really late, in which case, your injera probably won't work because too much time will have passed between the steps!)
After the mixture has been in the refrigerator for about 1 hour, it is ready to cook!
Unfortunately, the video I made of the first 3 injeras that I cooked was too long for youtube.com by about 30 seconds! So, I am not able to show the consistency of the injera batter. It should be thin and watery. Just a little thicker than batter for crepes. If it's too thick, it doesn't spread out on the mitad very good.
Heat up your mitad to the highest setting, just slightly above 500 degrees. Each mitad is slightly different, depending on age, heating coil, etc. So you may need to experiment with the temperature. On my Ethiopian friend Abeba's mitad, she uses about 475 degree heat. I have to use 500 degree heat. We have the exact same mitad, but they were purchased at different times.
Once the mitad is good and hot (this takes a little while), you need to sprinkle about 1/2-1 tsp. salt on the surface. Using a damp, clean cloth, rub the salt into the mitad in a circular motion. You must do this after every few injeras. It aids in achieving the ain (bubbles) in the injera. But salt isn't good for the Teflon coating, so try to only use it as needed so that your mitad will last longer. NEVER use oil on the surface!!!!! I read that oil permanently adheres to and changes the properties in the Teflon. I use my mitad only for injera. Never anything else.
Once you have salted the mitad, gently stir the injera batter to get it mixed up and pour approximately 1 cup of the starter onto the hot mitad. In Ethiopia, injera is made by pouring in concentric circles working toward the middle. In America, this method does not work. It produces a very thick injera. Perhaps this has to do with altitude? I don't really know. But I do know what works!
Your pour the starter onto the mitad then pick it up and shake it gently in order to get the starter spread out over the entire surface of the mitad. You may notice the ain starting to appear. This is good. Cover it with the lid. Once steam starts pouring out of the small vent in the mitad, lift the lid just a little to check on the injera. If it has started to lift up a little bit around the edges, it is ready to come off.
If you cook injera too long, it becomes soggy and gummy, as the steam is trapped inside.
Removing the injera is tricky. Well, it's been tricky for me! The first time I dropped half of them into a gummy pile! I use a sufid (Actually, it's smaller than a suffid. I don't remember what it's called) that I bought in Ethiopia. Basically, you need to find something that is the size of the mitad (16 inches) and flat. Using your finger, you gently lift one edge and quickly slide the suffid underneath the injera. Set it down on the sheet, still on the suffid.
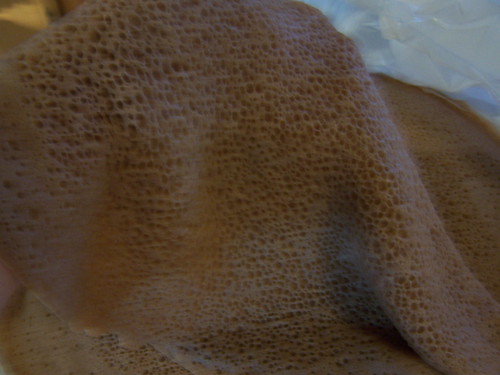
The injera will look gummy and not good when you first take it off. As it cools, it becomes the nice spongy consistency of injera.
Often, the first injera won't be good. It might be gummy or lacking in ain. Often though, the rest will turn out okay. So, if the first one isn't good, try another one.
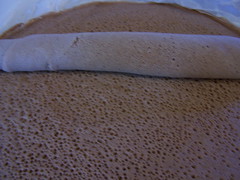
Begin cooking the next injera. After you have the lid on, then go back and remove the injera from the suffid. Lay it on the sheet. Note: If you stack the injeras on top of each other right away, they will stick together and you won't be able to separate them. If you let them cool on a sheet first, then stack them, they will peel apart when you're ready to use them.
Variations:
Now, I will address the color and taste of injera. Most reseraunts that I have eaten at in America serve a whiter injera. However, as with American bread, darker bread usually contains more nutrients. The same is true of darker teff and darker injera. To make lighter injera you can use ivory teff which is usually the same price as regular teff. It's usually specified that it is ivory. Another way is to experiment with the ratio of teff to other kinds of flour. I have not tried this recipe yet, but an Ethiopian woman who sells injera for a living told me that she uses teff, barley, and self-rising all in equal proportions. Experiment. And let me know what you come up with! Just remember that if you use too much teff, the injera won't have enough ain in it.
Conclusion
So, this has been a lot of information. As with anything, when you've done it a few times, it's easy to forget steps in the process, or information that wasn't so obvious at first. So if you get started and run into a question that I haven't addressed, please feel free to email me with your questions. moore4jesus1@juno.com
Good luck! :)


63 comments:
Amesegenalhu Amesegenalhu Amesegenalhu!!!!!!!!!!!!!!!
Thank you for taking the time to do this. I have been trying to make injera for about 3 months now and I almost have it. My Ethiopian gwadengna says that mine is OK but I think he is just being polite. I just "discovered" the self raising flour secret a month ago and can't believe the difference.
Now I have to find the mitad. They don't sell them in Canada.
This is awesome! I linked to you on my Ethiopia blog
Mary
Selam Burayee,
It is amazing to see such a wonderful family. I am very much impressed by all what are doing. Let the blessing of God be with you at all times.
Hope many peoples will have life long lesson from your website. I am one of them.
Keep it up !!!!
Dereje
Heather, I am SO excited to follow this step by step in the near future! Thank you for taking the time to write all of this up! Amazing. You rock!
jen
To remove my injera I use two pancake turners (plastic, as to not scratch my mitad!). One on each side, I pick it up, move it over and drop it onto the sheet. The first few times I had a gummy mess, but now I have the hang of it.
Thanks, Heather! I don't have sound on my computer right now, but I'm looking forward to watching your videos once I do!
Thanks so much Heather. I have relied on the market for my injera but secretly always wanted to try it myself -- I feel more confident with a step-by-step. Will you ever post some of your Ethiopian recipes as well?
Heather, thanks for all the tips...I will be sending this all around Australia to girls who want to have ago at making injera.
Leisa.
Love seeing the pics of your kiddies.
Wow! Great big help! I just finished my first sucessful batch of injera and I just wanted to say thanks!
For those who might be skeptical, let me say that it's not as complicated as you think.
I started out with half teff, half normal flour and it was awful smelling at first. I almost threw it out but aftera week it started smelling like alcohol and then yeasty.
I halved the recipe with no problems.
I also used a normal non-stick skillet on a gas stove-on high and it worked great. To get it out of the pan I just slipped a large dinner plate under it. Worked well, and it can cool on plastic wrap and it works the same as a sheet.
I can't wait for dinner tonight!
Hi
I had Injera with a hot spicy meat sauce in Footscray in Melbourne some years ago and loved it. I never knew the name of this type of bread untill today and I have searched the net in search of Teff Flour. I am in Perth Western Australia and was hoping you could tell me how to find the Teff Flour to buy as I cannot locate any.
Thank you
Gerry
I'm so glad I stumbled upon your blog. Thank you so much for sharing this recipe, I am going to try to start it tonight.
much love & blessings
-Anna D
Thank you for all your hard work! We
adopted our 4 Ethiopian kids 5 years ago and our oldest son Ephrem (now 22) and I have been trying to make decent injera for years. We had given up and were just buying it (which costs an arm and a leg!) We tried your directions and voila! pretty decent injera. Ephrem was incredibly happy. I will be passing this on at our Ethiopian Heritage Camp this summer. You have solved a mystery.
Gayll P-H
Thank you for your detailed instructions! I want to encourage everyone that you do not have to use a mitad. I made my injera last night (it was a little too thick, but gives me reason to try again) and I used a cast iron griddle. Through trial and error I realized that I had to grease the griddle lightly--I used crisco shortening and applied a thin layer with a paper towel-- and had the flame set to medium. I cooled them on wire racks and they were properly sour, spongy and yummy, just too thick, as we all got full too fast!
I did discover that you can buy a mitad marketed under the tag 'Lefse griddle' at Target online. They are identical units labeled differently in different markets. Price was around $90--I'll keep the cast iron griddle for a little longer!
Thanks again,
Sarah in Indiana
hello!
i'm hoping to find someone who already has a starter, since it will be hard for me to feed it as often as i'm suppose to (plus i want to be lazy if i can!).
does anyone in sydney have one started that i can smooch off? i'd be very grateful.
cheers!
/anna
Good Job! :)
Where do you get a "Mitad?"
You can't make genuine injera with a wheat starter. The bacteria-yeast combination in a teff starter is completely different than that in wheat starter (and it is much more complex as it has several types of yeast). This is probably why you have to resort to using self-rising flour. With an actual teff starter, I have no problem making injera with 100% teff that has more eyes than those in your pictures.
Thank you very much for Injera recipe.My grand-son takes gluten free diet. Could you please suggest any other grain[[like- quinoa, amaranth,sorghum, millet, tapioca,potato or any other gluten free flour] instead of self rising flour for making Injera starter.
Thank you so much! I'm going to try my 2nd attempt tonight, hopefully it will go better than the 1st! :) Thanks for the great videos :)
Your step by step instruction for Injera was fantastic! It turned out exactly right.
I spent a few decades as a professional chef, only to fail in my first few tries at injera. So frustrating!
Then I followed your directions, watching and rewatching the videos. Today I made injera successfully. Thank you.
FYI my mitad is a circulon 12.5" International pan with an aluminum pizza pan for a lid. I used an infrared thermometer to get the right(500º)temperature. It was much hotter than I would have made it based on experience.
But it was fantastic, we ate two while the others were cooking. Good with olive oil and zactaar if you can't wait.
Thanks again.
That's a long process. I'm making this today. I think I'll try to shoot it, but I don't think it will be as pretty as your picture!
This is really awesome! I love Ethiopian food and have been searching for a system to make my own Injera. I also run a website featuring Vegan recipes www.mevegan.com I will post a like to your article. Thanks so much!
Hi, I've made your injera bread 3 times now and I've GOT IT! I don't have a mitad, but I use my well seasoned cast iron skillet for mini versions of injera bread and it works WELL.
A note for those who don't have a mitad and want to try in a skillet. I tried salting my skillet, but that didn't work. Just use an ungreased seasoned skillet, occasionally wiping with a greased paper towel to keep injera from sticking. I use about 1/4 of a cup of batter instead of 1 cup. Cook on medium or slightly above medium heat, and follow the rest of the instructions. It makes about 30 or 35 skillet sized injera.
THANK YOU! your recipe and video tutorials are above and beyond!
I have made injera that always sticks to the pan. I reseasoned my cast iron frypan and wiped it out with paper towel. I then placed coarse sea salt and wiped it around with paper towel. I found this not only absorbed excess oil but also when done inbetween injeras helped remove any debris left behind. I made 15 injeera with no sticking. thanks for the salt tip. i think i may have to but a dedicated injera pan.
Thank you for these detailed instructions. I made it from another recipe and it was too sour. This was just perfect taste. I'm still getting the hang of cooking them, but most turned out great. I used a non-stick skillet with a lid and just light sprayed the surface with cooking spray every so often. the salt didn't work for me. They all stuck to the pan.
We are hosting an Ethiopian potluck and I'm excited to show off my Injera skills!
Any tips on how to store the injera once cooked, and how long it will stay good?
Thank you so much for these terrific instructions! I have tried a few times and failed each time. But, today, after following all of your instructions, I made my first batch of pretty successful injera... and my family loved, loved it! You are an excellent teacher!
I had given up.
My so-called attempts at injera were just that -- attempts. My attempts were flat, thick, sticky disasters. I'd tried several different recipes but nothing worked. I couldn't even come close. This was in 2003.
A month ago, I successfully started my first sourdough with wild yeast and teff.
Today, however, I made my first batch of good injera. I can hardly believe it. And it is all thanks to you!!! Hooray!!! Unbelievable! The impossible became possible.
I just put my stack of leftovers away in the refrigerator. Mm mm mmm. I'm looking forward to crispy, toasted injera tomorrow!
Heather, Thank you so so so much for sharing what you know. You've put so much effort into sharing the details in ways that are clear, easy to follow, and complete. I send you kudos and gratitude.
Hi! I've been using your webpage to make injera for maybe two years now, and thought I should leave a comment to thank you! I was amazed the first time I did it, after weeks of studying your videos and buying a mitad from Target. I took a bite into these perfectly sour and bubbly injeras, and I was stunned at the result. It was injera! Exactly like I've had in restaurants!!! Now that I've made it many times, it's really not that difficult at all. And my sourdough starter is still alive after all this time! So thank you for all the hard work you've done, and for sharing this great skill with the world! I would never have been able to do it without you!!! Please continue to post your cooking adventures and the pictures of your beautiful kids!
Heather, oh my gosh, thank you soo much. I just finished a very nice meal with my wife and thanks to you the injera was near perfect. I studied your videos and blog posts for weeks. Tomorrow night is more injera with the whole family and left overs. Thank you again. You got skills....
GJO,
You're definitely right. I have a couple dozen Ethiopian and Somalian restaurants in my city along with a number of close Somalian friends in my church, and none of them had ever heard of using self-rising flour in their injera. They all remarked "that's such an American thing to do, lol." I think the key of why this is added is found in Heather's starter; one thing I noticed is nowhere mentioned on Heather's blog is that after you feed you starter, it should almost triple in size with the volume being all bubbles (which create the ein). After 4-8 hrs it will deflate again. Particularly the starter method on this blog would have the starter almost dying in many parts. You shouldn't have your starter go for many days without it being fed in the beginning. You'll notice water at the top of the container called 'hooch'. It's a normal byproduct of our friend the Lactobacillus sanfranciscensis when a starter is starving and has no more food available. It should be fed immediately at this point.
A strong teff starter should almost triple in size after you feed it. Africans until recent times had no access to wheat grains and definitely no access to self-rising flour or baking soda. These steps make this process unnecessarily complex and long. You just feed your 100% teff starter, wait a few hours for it to atleast double in size with bubbles and then make injera. Much quicker and simpler.
Also, there's no need to be wasteful and be throwing away cups and cups of starter. It's far quicker and easier to make a strong small starter (1/4 cup) and then when it's done in a 3 weeks, multiply its volume. You would seriously go through a couple bags of flour with this blog's tech just to make a starter.
Thank you for your time on helping people like me make a perfect injera. I made injera for the first time yesterday using the Bethany House "lefse grill" or "mitad". It was tricky for me to remove the injeras because I didn't have anything flat that would not burn in contact with the hot mitad surface so I tried to use my hands. All of them ripped but one, that I used to serve the dishes on but I noticed one thing: pouring 1 cup of batter on the mitad made a very thin injera, so I poured about a cup and a half and it came out much better and easier to remove from the mitad. Another observation I made was that my injeras were slightly browned/overcooked on the bottom, so maybe a lower temperature would work better ( I set it for the max - slightly above 500F ). My mission now is to find something like you have to remove the injeras from the mitad before I make injeras again in the next month ( so my starter won't "die" )Any suggestions??
Overall: I loved my first experience cooking injeras. They looked funny but tasted great! :)
Soraya.
Thank you so much for doing this! I have been wanting to try my hand at injera and you have given me the tools- thank you! I posted your video on my blog, I hope that is okay with you.
http://berryfam.wordpress.com/
Abby
With all due respect, I don't see why anyone needs to go through all of these involved steps, as above. My injera recipe: 2 cups of Teff flour, 1.5 cups whole wheat flour, one packet of yeast, 3.5 cups of water at 112 F. Mix it all up, place in oven with light on, wait two days, stir crust back into mix, wait one day, stir blackish liquid back into mix, pour 1/3 cup onto hot, lightly sprayed with oil and wiped non-stick, crepe pan, shake to distribute, do flip when corners rise, let cook another few seconds, slide off----Perfect, sour-dough injeras every time with no fuss. Maybe I'm a one in a million guy who has just the right spores and/or cells in my oven to make great tasting injeras, although I suspect anyone can do as well.
Wow, pretty humble the anonymous above.
I am here again to take a comment back I made. In a previous comment I said:"pouring 1 cup of batter on the mitad made a very thin injera, so I poured about a cup and a half and it came out much better and easier to remove from the mitad".
That was when I didn't have anything to remove the injeras from the mitad and I was using my hands, so they ripped. Now I have woven straw placemats that I use for that purpose and they work great. I noticed last time that pouring just 1 cup or 1 1/4 cup max worked better and the injeras came out nice and thin. Before I had the placemats they were too thick and made me and my guests fill up on injera too fast.
I have tried two recipes for injera, the first time I used a different recipe than the one in this blog because I didn't have a starter yet. It is one adapted from the one here and ethiopianrestaurant.com (according to the website):
http://breadchick.blogspot.com/2009/04/bread-baking-babes-dont-always-knead.html
The second time I used the one in this blog. They both turned out great and they both have their advantages and disadvantages.
The first one you have to let the starter ferment for a minimum of 5 days if you don't have a starter and if you let your tarter die you just need to plan ahead and take some days for the fermentation process to take place. Also you don't need to knead or pour the black liquid out.
Heather's recipe, the one in this blog, also makes a very tasty injera ( I found it a little less sour than the first one ) and it takes much less time fermenting (rising) if you have a teff starter. The down side of this recipe is that you need to keep the starter alive and you have to make injeras at least once a month so it won't die. I wish I would make it every month, but cooking the injeras is the least work you will do; cooking the dishes to serve with them takes time and energy-in my case because I cook a minimum of 2 vegetable dishes and 2 meat dishes.
My starter already died and I will have to follow the first recipe. It's less work but it takes longer.
I am still trying to perfect the stews and vegetable dishes so if anyone has good recipes and maybe would like to email me a few (magicsoraya@gmail.com) I could also email you the ones I have - I have some very good ones.
Thanks.
Soraya.
Continuing the last comment...
P.S: Heather, I hope you don't mind me posting the website for another recipe. I won't be upset if you delete my comments :)
Soraya.
Humble? No,I'm simply saying that I make perfect injeras with none of the involved, detailed steps many of you go through. You age your batter five days!!!??? The one thing we have in common is that we know that the blackish liquid should not be skimmed off. It actually contains much of the sour-tasting bacteria/fungi that help give the injeras their distinctive taste. I never keep a starter from any of my batches as I know that my oven apparently has the right stuff to sour any new flour mix I put in it. The light bulb is crucial, I believe, to keep the oven on the warm side. I just made up a dozen injeras and I'm nibbling on one as I type this. Yummmmmy!
Soraya, do you have a good recipe for Berbere and Niter Kibbeh? Without those two, it is tricky to make good, authentic-tasting dishes. With those two in hand, I can throw two cans of beans in a sauce pan, add the two, as above, and have folks raving about my gourmet Ethiopian cooking ability. LOL! FWIW, I have friends who lived in AA and they have raved about my dishes. I am vegan, so no meat on my table, ever.
Injera is really wonderful. No wonder the rest of the world did not catch up to it since its hard to make and teff is hard to grow. Its such a nutritious grain and its usage thru Injera is the best way. I am thinking to serve stews with it instead of wheat bread. Also it can be used in restaurants as a bedding to any kind of food whose taste goes with the sour nature of Injera.
Self rising flour and other things such as barley, wheat are ok but these have immense amount calories. Would be better to figure out how to make Injera entirely of Teff as done in Ethiopia.
Not sure there's much to "figure out." As I posted, above, my warm oven seems to have the right stuff to perfectly sour my batter of teff and whole wheat flour. Next time around, I'll go with teff, only. Those injeras will be pricey little suckers, though.
I am from West Africa, and although quite a distance from Ethiopia was introduced to Injera while in Kenya.
I have to give you kudos for the great tutorial of how to make injera.
Just made my first batch today and it turned out fantastatic.
I am a guy and my wife and children are psyched about the injera a other side dishes I am making tonight.
God bless
Ike
I love this blog and found it while looking for a real Ethiopian metad. Learned that the less-expensive "pizza cooker" was at Target. I presently use a Presto flat grill and it only goes up to 450. It works and has had oil and other foods cooked on it. It's not dedicated to injera. How I clean it is with just plain salt. But I do get rounded injeras by tilting it and forming round ones. The ain form perfectly. I am able to steam it with a huge cookie sheet. Thumbs up for innovation where there's lack of the right tools!!!
Just wanted to mention that I use Indian "juwar" flour along with my teff, as well as the Indian teff called "bajri" flour when my red teff is low. Sometimes, I'll mix in Mexican "masa harina." These all make a bubbly mix as well. I mix them all together with fast-acting yeast and proceed with the self-rising, although, I'd like to get rid of that soon. I do not use the black liquid as this is usually not done. Keep up the good work and congrats on the children.
Thank you so much!!
We found your blog incredibly helpful. So many injera recipes gloss over the steps and yours was the only one that led to successful injera. My family, who lived in Ethiopia, was skeptical of ever making good injera at home. Thanks to your recipe, they've become believers.
I've been trying to make good injera for over twenty years - Thank you - Mine didn't come out as good as Mesob's but it will give me my Ethiopian fix in between making the hour each way -And left all my other attempts in the dust * We left Ethiopia in the 70's I would have never believed then that I would be buying teff in my Northern NJ Shoprite- Thank's PS I've been told that the water and altitude has a lot to do with proper injera - lower more flour higher less -
Thanks for the information and I will let you know how I go.
Wow, thank you so much for this! I am an Ethiopian and i have never dare to make Enjera as it seems too complicated so i just buy it. I do want to make it home as i do want more of the teff and less of the other flour in it for nutritious purpose. I will follow this, thank you!
Hi. Your explanation on how to make starter, how to knead the starter dough, and putting it into the blender, is one of the best detailed instructions I have found so far. I spent several hours trying to educate myself on Injera and your posting is really the best.
There are critics.. I read the responses on your blog... but the bottom line is, you have provided those who really want to know the details they need in order to get started.
I used to make Injera many years ago, but it was hit and miss. Sometimes it came out ok, other times it didn't. I ended up giving up after my last failed attempt but I've always wanted to know the sure-thing way of making it. You have finally provided that.
Your blog is full of interesting family knews. Wish you and your family well. Thanks for posting.
Tendayi
We used your recipe successfully! What a relief. Thank you so much for sharing it. I wrote your directions as efficiently as I could, and thought I might post them here, in case it was of use to anyone. I recommend that anyone doing it for the first time *not* use this briefer version, because your comments are very helpful, and made us sure that we were doing the right thing. However, this is a quicker "reference" version.
# Recipe: Injera, adapted from http://burakaeyae.blogspot.com/
## at night,
1. Pour any accumulated liquid from off the top of your teff starter (*lit*).
2. Sift 2 C. t'eff flour into 2 C. t'eff starter.
3. Knead (*mopkwat*) for at least 10 m., into a coherent ball of dough.
4. Add .25 C. of luke-warm water and knead in. Repeat until very soupy texture is achieved.
5. Cover and let sit, unrefrigerated, overnight. The starter may separate into 3 layers, which is good.
## in the morning
1. Thoroughly stir starter; **reserve and refrigerate 2 C.** for the future (feed weekly).
2. Blend the starter in a blender, a cup or two at a time, until the gritty feel disappears.
3. Mix and blend 3 C. of self-rising flour to match the soupy consistency of the t'eff starter, and thouroghly mix into to the t'eff starter.
4. Cover and let rise for a while.
5. After the rising peaks and begins to fall, refrigerate for an hour.
# in the afternoon
1. Preheat griddle (*mitad*) to highest temperature (then draw down temperature a bit ~475?).
2. Sprinkle salt on the surface of the mitad and wipe off in a circular motion.
3. Stir starter, and pour 1 C. of starter on the dry mitad, turning the mitad by its handles, to cover the surface entirely.
4. Cover until steam emerges from under the lid.
5. Check to see if the edges of the injera are beginning to pull up from the surface. If so, remove the cover entirely and remove the injera with a paddle, peel or lefse turning stick, and place on sheet or cloth to cool.
6. It will become less gummy and more spongey as it cools, and will become stackable.
This is so wonderful. I've been trying to make injera for years and I hope this works. I am now on step two but I have a question about saving the starter for future use. I saved 2 cups of starter and it is now in my refrigerator.
How often and how much do I feed the starter to keep it alive?
You can find many in toronto or this website: http://www.wasselectronics.com
TEFFCOM is one of the leading Teff food export company based in Tel aviv, israel. its Producing Teff grain, Packing teff and Exproting Ethiopian food items.
Thanks for your blog. I make injera using only teff and no baking powder for health reasons. If anyone would like to try using only teff, I encourage you as it is not harder to do as people say. Just more expensive. Everyday I make 3 injera for one person. I take some of the starter from previous day. (The first time I used yeast since my sourdough starter did not come out well. By now it is quite a sourdough. Don't be afraid to use yeast the first time if you can't make starter) I knead in a cup of teff flour by hand, then put in kitchenaid mixer and slowly beat in half the water with paddle. I reserve a cup of this for tomorrow. TO the rest I beat in more water and half teaspoon salt. I put in the blender for a minute, then reserve for the next morning. I cook in a crepe pan with salt, over high heat, then lower and cover once bubbles have formed. There are plenty of eyes (bubbles) so for those who don't want to use bp or self rising flour, don't. THanks so much, I love your site.
Hello this is Rahul Parihar, I am really impress with your Blog and also I used to surf it generally many of times in a month , Thanks for giving such a good content of topic Fathers Day Wishes
We are additionally sending out other unique items everywhere throughout the world. We are known for the most part for our entrenched global exchanges of teff grain and working together principally in the business sectors of USA, Europe, Middle East, India and China. We offer amazing items and incredible transportation administration.
What a great Article is this and It have wonderful images in it.IdealShape coupon
I too have this question. I think you can Dore as itviut to dry and it’ll end up looking like flakes much like nutritional yeast looks except it’ll have a color of the injera batter. Read my query I posted here, below.
Hello.
I read your page about making injera. I was hoping you would know how to dry the yeast starter.
I was gifted a small ziplock snack sized bag full of what looked like flakes of dried crumbly yeast from a woman who owns an Ethiopian restaurant I think either in Denver or Ohio. I ate in both locations and can not recall where I was given this baggie.
I’ve been treasuring it for a few years- hoping to get the time to make it at 4500’ elevation in Sedona.
This restauranteur said this is the secret to her injera and that it couldn’t be purchased in stores.
My question to you is—- do you know of a method to make more of this and how to dry this yeast into thin sheets and crumble them like she did?
Thanks so much for all of your information. I have found that a wooden pizza peel works well to take the injera off of the grill.
I guess I have selected a mind blowing and interesting blog bestreviewsity
I'm so excited to go through this in detail and learn to get it right. I've been trying for a while to learn how to make injera with varying levels of failure! Thank you so much!
I am getting eyes from the back also. How do I avoid that and get a smooth surface on the back.
You just have to find a Ethiopian food market and look for a sifed
Post a Comment